Getting Started
The following guide provides an overview of how to connect to the farm and interact with a board hosted in the farm.
Connecting to a Virtual Machine (VM)
Devices hosted by the farm are available through the use of a remotely accessible per-user VM. Access to the VM is achieved via SSH, though please note you will need to first connect to the farm VPN.
Connect to the VM via SSH as follows:
$ ssh amurray@v-amurray.thegp.cloud
Welcome to Ubuntu 22.04.5 LTS (GNU/Linux 5.15.0-135-generic x86_64)

amurray@v-amurray:~$
Using bfmc to Discover and Request Access to Devices
The bfmc utility is used to discover devices that are available to you and to claim and release exclusive access.
To list the devices available to you, use the bfmc devices command:
$ bfmc devices
You have access to the following devices:

tgp-rpi3 (in use by you)
tgp-rpi4b
tgp-rpi5

Run 'bfmc info [device]' for more information
The output from bfmc will show the nams of devices available for use, it will also indicate if those devices are in already being used by yourself or others.
To request a device for exclusive use, use the bfmc use command:
$ bfmc use tgp-rpi5
You are now using device tgp-rpi5
tgp-rpi5 is available at udev idpath pci-0000:09:00.0 (view device nodes with lsudt -b tgp-rpi5)
Boards that are hosted in the farm are each connected via a USB hub, for example this may include USB-to-serial adapters that provide access to a board’s serial console, or perhaps USB relays that switch power to the board or control if a DIP switch or reset button is pushed.
The bfmc use command will passthrough the PCI-USB controller that is associated with the USB hub into the VM - thus providing unrestricted access (see this page for the rationale behind this approach). You can use dmesg to see the enumeration of PCI/USB devices upon completion of this command.
Upon running the bfmc use command it will describe where the PCI-USB controller is located in the VM’s PCI topology.
Using bfmc and lsudt to Understand Device Connections
It’s helpful to clearly understand how a board has been connected to the farm and how this appears inside the farm VM.
The lsudt utility can be used to visualise the USB hub that board is connected to, along with any device nodes that result from it. As per the output from the bfmc use command you can examine the topology via lsudt as follows:
$ lsudt -b tgp-rpi5 # or alternatively lsudt -i pci-0000:09:00.0-usb-0:1
Port 3-1: Raspberry Pi5 (45b:209 / 3-1)
    Port 1: SDMux (424:2640 / 3-1.1)
        Port 1: Device (424:4041 / 3-1.1.1)
           /dev/sda
           /dev/bsg/6:0:0:0
           /dev/sg1

    Port 2: UART (1a86:7523 / 3-1.2)
       /dev/ttyUSB0

    Port 4: UART (403:6001 / 3-1.4)
       /dev/gpiochip0
       /dev/ttyUSB1

Port 4-1: Raspberry Pi5 (45b:210 / 4-1)
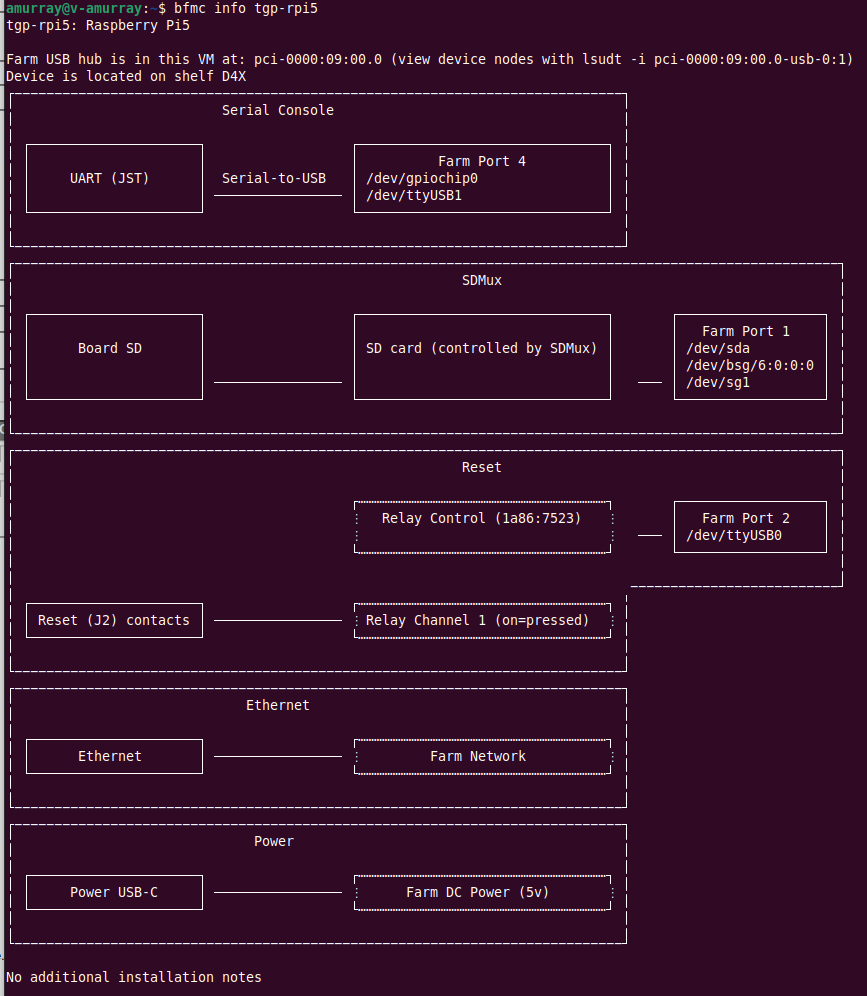
The bfmc info command can be used to visualise the physical connections between the board and farm, as follows:
Please see the man pages for bfmc and lsudt for further information and capabilities.
Booting the Raspberry Pi 5
The steps for flashing and booting software on your device will vary depending on the device and how it has been connected. In this section we’ll provide the steps based on a Raspberry Pi 5 connected as shown in the earlier bfmc output.
First we’ll download and extract Raspberry Pi OS:
$ wget https://downloads.raspberrypi.com/raspios_lite_armhf/images/raspios_lite_armhf-2024-11-19/2024-11-19-raspios-bookworm-armhf-lite.img.xz
$ unxz 2024-11-19-raspios-bookworm-armhf-lite.img.xz
The Raspberry Pi OS image needs to be written to an SD card. The Raspberry Pi 5 has been installed in the farm with an SDMux which allows for sharing as SD card between a host (the VM) and a device (the Raspberry Pi 5). Let’s interact with the SDMux via its USB interface to write the image to the SD card:
$ sudo usbsdmux /dev/sg1 host  # Assign SD card to VM
$ eval `lsudt -x -b tgp-rpi5 -w TGP_RPI5_SDMUX_0`  # Wait for first disk to appear
$ sudo dd if=2024-11-19-raspios-bookworm-armhf-lite.img of=$TGP_RPI5_SDMUX_0 bs=1M conv=fsync
$ sudo usbsdmux /dev/sg1 dut  # Assign SD card to VM
The ‘host’ and ‘dut’ arguments to the usbsdmux utility are used to specify which device the SD card is ‘plugged into’. Once the SD card has been assigned to the host it can be accessed via its usual device nodes (e.g. /dev/sda etc). However, rather than wait for the device nodes to be enumerated and determine what they are called, we used the lsudt utility to automatically do this for us.
Next, we’ll power on the board. The Raspberry Pi 5 has been installed in the farm with a USB relay that is able to bridge the reset button contacts of jumper J2. J2 acts like a soft power button - so let’s interact with the USB relay to ‘push the power button’ to turn the device on.
$ sudo ./usbrelay $TGP_RPI5_RESET_0 on
$ sudo ./usbrelay $TGP_RPI5_RESET_0 off # Pi5 uses a soft switch so perform a momentary press
Finally, we’ll use picocom to view the output on the serial port:
sudo picocom -b 115200 $LMS_CM5_UART_0 -r

[    4.230104] systemd[1]: Mounted dev-mqueue.mount - POSIX Message Queue File System.
[    4.240422] systemd[1]: Mounted sys-kernel-debug.mount - Kernel Debug File System.
[    4.245276] EXT4-fs (mmcblk0p2): re-mounted bb15c8e6-d999-4838-be67-5ff200bffa46 r/w. Quota mode: none.
[    4.259159] systemd[1]: Started systemd-journald.service - Journal Service.
[    4.316606] systemd-journald[283]: Received client request to flush runtime journal.

Raspbian GNU/Linux 12 raspberrypi ttyAMA10

My IP address is 192.168.10.165 fe80::4482:1cf8:3bd3:4614

raspberrypi login:
Releasing Boards
When you are finished with a device, you can release it with the bfmc release command, as follows:
$ bfmc release tgp-rpi5
Device tgp-rpi5 has now been released